
Installation Advice for Water Butts and Rainwater Diverters
A practical guide for homeowners and contractors on fitting water butts and rainwater diverters correctly.
Why Use Water Butts
Compatibility Checklist for Water Butt Installation
Gutter and Downpipe Type
Check whether your downpipe is round or square, and measure its diameter. Most diverters are designed for standard UK sizes (e.g. 68 mm round or 65 mm square). Choose a diverter that matches your downpipe profile to avoid unnecessary adapters.
Available Space
Measure the area where you plan to position the water butt. The butt should sit on a firm, level surface close to a downpipe. Allow space for the diverter connection and easy access to the tap.
Water Butt Capacity and Tap Position
Select a capacity that suits your garden size and rainfall. Ensure the butt has a threaded outlet at a convenient height for attaching a hose or watering can. Check that the diverter kit includes a suitable hose connector.
How to Fit a Water Butt Diverter: Step-by-Step
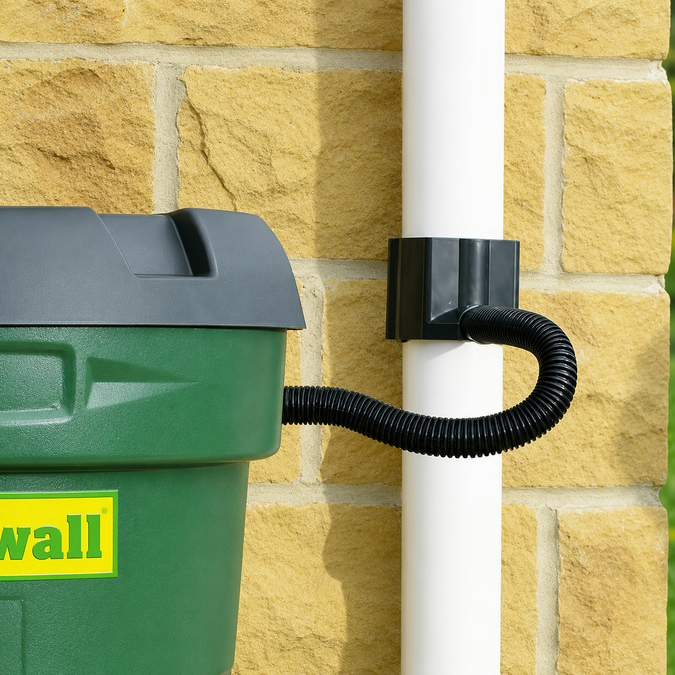
Mark the downpipe – Hold the diverter against the downpipe at the desired height (usually 300–500 mm above the top of the water butt) and mark the top and bottom of the diverter body.
Cut the downpipe – Use a fine-tooth saw or pipe cutter to make two horizontal cuts at your marks. Remove the section of downpipe between the cuts.
Fit the diverter – Slide the diverter into the gap, ensuring the sealing gaskets sit snugly against the pipe. Secure with the screws provided (hand-tight only to avoid cracking the plastic).
Connect the hose – Attach the flexible hose from the diverter outlet to the water butt inlet. Use a hose clip or jubilee clip to secure the connection.
Position the water butt – Place the butt on a stable, level stand or base. Ensure the inlet aligns with the hose and the tap is accessible.
Test the flow – Fill the downpipe with water from a bucket or wait for rain. Check for leaks at the diverter joints and hose connection. Adjust if necessary.
For more detailed product-specific instructions, refer to the manual supplied with your diverter kit. Our Water Butt Range includes compatible diverters and accessories to simplify fitting.
Essential Accessories for a Successful Installation
Filters and Debris Screens
A rainwater filter or debris screen prevents leaves, moss, and grit from entering your water butt. Fitting a filter at the diverter inlet keeps the water cleaner and reduces blockages in the hose and tap.
Connectors, Stands, and Overflow Kits
Use a flexible hose connector to bridge the diverter and butt. A sturdy stand raises the butt for easier tap access and improves water pressure. An overflow kit diverts excess water away from the foundation, preventing unwanted pooling near your property.
Troubleshooting Common Water Butt Installation Issues
Leaks at diverter joints – Ensure the sealing gaskets are correctly seated and the screws are tight but not over-tightened. Check that the downpipe cut is clean and straight.
Poor water flow – A blocked filter or debris screen is the most common cause. Clean the filter regularly, especially after heavy rain or storms.
Overflow problems – If the butt overflows before the diverter cuts off, verify that the diverter’s float valve or shut-off mechanism is working. Also check that the overflow hose is not blocked or kinked.
Blocked tap or hose – Flush the system occasionally by opening the tap fully. If sediment builds up, fit an inline filter at the butt inlet.
If you encounter persistent issues or need advice for a larger installation, contact us for guidance tailored to your project.
Choosing The Right Setup For Your Needs
Frequently Asked Questions
Can I install a water butt myself or do I need a professional?
How do I prepare my water butt for winter?
How often should I clean the filter on my rainwater diverter?
What size water butt do I need for my garden?
Can I fit a diverter to a square downpipe?
Ready to Start Your Water Butt Installation?
Browse our full range of water butts, diverters, filters, and accessories to build the perfect setup for your home or project.